개발자의 1초,1분,1시간을 단축시키는 CLI (2) - fzf 를 활용한 반복 작업 자동화
이영수|2025년 10월 11일|6분 읽기
이번 내용 부터는 fzf 를 통해 어떻게 반복적인 작업을 자동화 할 수 있는지 살펴보자.
이런 자동화를 기반으로, 시간을 절약하고 생산성을 높일 수 있을 것이다.
이 글에서는 다양한 함수 예제를 통해 반복 작업을 어떻게 효율적으로 자동화할 수 있는지에 대해 다룬다.
어떤 요구사항에 의해 함수를 만들게 되었는지, 함수에 대해 설명하고 보이는 화면에 대해 보여준다.
회사 데이터를 노출하면 안되므로 당연히, 적절히 페이크 데이터로 보여준다.
함수 소개
아래 함수 목록은 개발 과정에서 발생하는 반복적인 작업들을 fzf를 활용하여 어떻게 효율적으로 개선할 수 있는지 보여준다.
ec2-connect: EC2 인스턴스 목록을 리전별로 조회하고 선택하여 간편하게 SSH로 접속하는 함수s3-download: S3 버킷과 파일 목록을 대화형으로 탐색하여 원하는 파일을 쉽게 다운로드하는 함수jpr: GitHub PR 목록에서 브랜치 이름을 기반으로 연관된 JIRA 이슈를 터미널에서 바로 조회하는 함수gs: Git stash 목록을 미리보기와 함께 확인하고, apply/pop/drop 등의 작업을 손쉽게 관리하는 함수gpr: 팀원의 PR을 선택하여 해당 브랜치로 자동으로 체크아웃하고, 코드 리뷰를 빠르게 시작할 수 있도록 돕는 함수spring-loggers: 실행 중인 스프링 애플리케이션에 접속하여, 특정 로거의 레벨을 실시간으로 선택하여 변경하는 함수
1. ec2-connect
- 요구사항 : ec2 접속을 화면을 통해 목록을 조회한 후 선택해서 접속하고 싶다.
(즉, 어떤 인스턴스의 IP 나 인스턴스 ID 를 몰라도 바로 접속이 가능하게)
우리 팀은 GPU 인스턴스를 값 싸게 사용하기 위해 다양한 리전에서 스팟 인스턴스를 사용한다.
그리고, 인스턴스를 들어가서 인스턴스의 상태나 파일 시스템 상태를 확인해야 하는 경우가 존재한다.
스팟 인스턴스는 언제든 꺼지고 켜지므로, 인스턴스 ID, IP 가 달라질수도 있고 개발자가 매번 기억하기에는 어려울 수 있다.
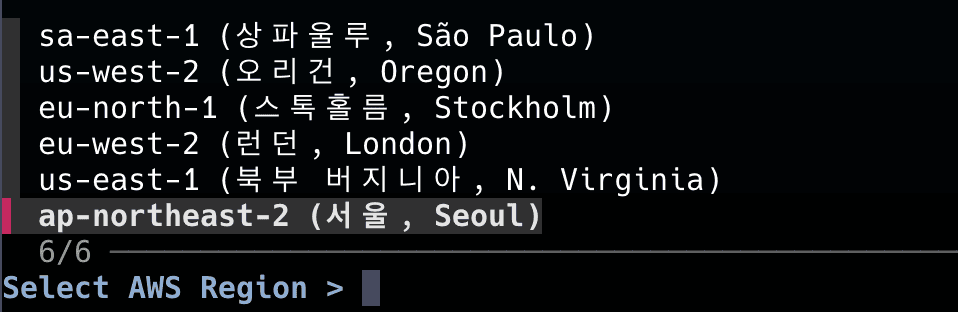
그래서, 특정 리전을 선택하면? 활성화 되어 있는 EC2 목록을 보여주고 선택해 접속할 수 있게 한다.
function ec2-connect() {
    local regions=(
        "ap-northeast-2 (서울, Seoul)"
        "us-east-1 (북부 버지니아, N. Virginia)"
        "eu-west-2 (런던, London)"
        "eu-north-1 (스톡홀름, Stockholm)"
        "us-west-2 (오리건, Oregon)"
        "sa-east-1 (상파울루, São Paulo)"
    )

    local selected_region_display
    selected_region_display=$(printf "%s\n" "${regions[@]}" | fzf --prompt="Select AWS Region > ")
    if [[ -z "$selected_region_display" ]]; then
        echo "No region selected."
        return 1
    fi
    local selected_region_code="${selected_region_display%% *}"

    local instance_info
    instance_info=$( \
        aws ec2 describe-instances --profile mfa --region "$selected_region_code" \
            --filters "Name=tag:Name,Values=*ai-service*" "Name=instance-state-name,Values=running" \
            --query 'Reservations[].Instances[].[InstanceId, PublicIpAddress, PrivateIpAddress, InstanceType, Tags[?Key==`Name`]|[0].Value, State.Name]' \
            --output text \
        | fzf --prompt="Select EC2 in [$selected_region_display] > " --header="ID | Public IP | Private IP | Type | Name | State"
    )

    if [[ -n "$instance_info" ]]; then
        local instance_ip
        instance_ip=$(echo "$instance_info" | awk -F'	' '{print $2}')
        local instance_name
        instance_name=$(echo "$instance_info" | awk -F'	' '{print $5}')

        if [[ -z "$instance_ip" || "$instance_ip" == "None" ]]; then
            echo "Selected instance has no public IP. Cannot SSH."
            return 1
        fi

        echo "Connecting to $instance_name at $instance_ip..."
        ssh -o StrictHostKeyChecking=no -i "/Users/iyeongsu/.ssh/aws.pem" "ec2-user@$instance_ip"
    else
        echo "No instance selected."
    fi
}- regions 를 선언한다. ( 내가 선택할 리전 목록 )
- regions 를 배열로 출력한다 -> 그 후, fzf 를 통해서 리전을 입력받는다.
ap-northeast-2 (서울, Seoul)라면 공백 뒤 요소들을 제거한다 -$\{selected_region_display%% *\}- 인스턴스 정보를 조회한다. - 선택한 리전 + Name 이
ai-service가 일치한 인스턴스만 + 상태가 running 인 것에 대해
InstanceId, Public IP, Private IP, 인스턴스 타입, 인스턴스 이름, 상태를 텍스트로 가져온다.
-> 그 후, ec2 인스턴스를 선택 한다.
aws ec2 describe-instances --region "$selected_region_code" \
            --filters "Name=tag:Name,Values=*ai-service*" "Name=instance-state-name,Values=running" \
            --query 'Reservations[].Instances[].[InstanceId, PublicIpAddress, PrivateIpAddress, InstanceType, Tags[?Key==`Name`]|[0].Value, State.Name]' \
            --output text
- 인스턴스를 선택하면, 이름과 IP 출력한 후 ssh 기반으로 인스턴스에 접속한다.
2. s3-download
- 요구사항 : AWS S3 페이지 및 직접 파일명을 검색하지 않아도 이미지를 바로 다운받고 싶다.
모드를 두개로 구분했다.
Mode 1 은 URL 을 알고 있는 경우에는 빠르게 다운을 할 수 있는 모드 (로그에 있는 S3 경로를 통해 바로 다운로드)
Mode 2 는 대화형을 통해 폴더 및 파일을 선택할 수 있어 유연한 모드 (폴더에 들어가서, 적절히 이미지를 찾아야 할 떄 유용)
function s3() {
# Mode 1: S3 URL 로 들어오면 바로 다운로드 시도
if [[ -n "$1" ]]; then
local s3_uri="$1"
if [[ ! "$s3_uri" =~ ^s3:// ]]; then
echo "❌ Invalid S3 URI. Must start with 's3://'."
return 1
fi
local filename=$(basename "$s3_uri")
echo "⬇️ Downloading $s3_uri to ./$filename..."
aws s3 cp "$s3_uri" "./$filename"
if [[ $? -eq 0 ]]; then
echo "✅ Download complete: ./$filename"
else
echo "❌ Download failed."
return 1
fi
return 0
fi
# Mode 2: Interactive search
# 1. Select bucket
local bucket
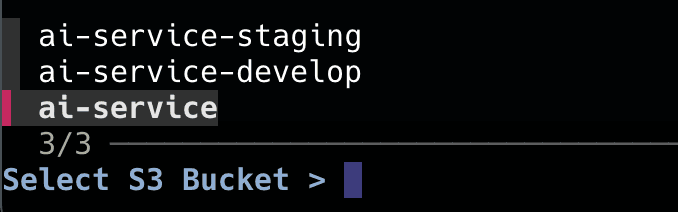
bucket=$(aws s3 ls | awk '{print $3}' | grep 'ai-service' | fzf --prompt="Select S3 Bucket > ")
if [[ -z "$bucket" ]]; then
echo "No bucket selected."
return 1
fi
# 2. Get optional prefix for faster search
echo "💡 For faster searching, enter a prefix (e.g., path/to/folder/2025/06/18/)"
read -r "prefix?Prefix (optional): "
# 3. Get optional filter keyword
read -r "keyword?Keyword to filter by (optional): "
# 4. List objects using prefix
echo "🔍 Fetching objects from s3://$bucket/$prefix..."
local object_keys
if [[ -n "$prefix" ]]; then
object_keys=$(aws s3api list-objects-v2 --bucket "$bucket" --prefix "$prefix" --query 'Contents[].Key' --output text | tr '\t' '\n')
else
echo "⚠️ No prefix entered. Listing all objects in the bucket. This might be very slow."
object_keys=$(aws s3api list-objects-v2 --bucket "$bucket" --query 'Contents[].Key' --output text | tr '\t' '\n')
fi
# 5. Filter by keyword
local filtered_keys="$object_keys"
if [[ -n "$keyword" ]]; then
filtered_keys=$(echo "$object_keys" | grep -i "$keyword")
fi
if [[ -z "$filtered_keys" ]]; then
echo "No objects found for the given prefix/keyword."
return 1
fi
# 6. Select object with fzf
local object_key
object_key=$(echo "$filtered_keys" | fzf --prompt="Select object to download > ")
if [[ -z "$object_key" ]]; then
echo "No object selected."
return 1
fi
# 7. Download
local filename
filename=$(basename "$object_key")
echo "⬇️ Downloading s3://$bucket/$object_key to ./$filename..."
aws s3 cp "s3://$bucket/$object_key" "./$filename"
if [[ $? -eq 0 ]]; then
echo "✅ Download complete: ./$filename"
else
echo "❌ Download failed."
return 1
fi
}Mode 1 은 명확하므로, Mode 2 만 설명한다.
ai-service이름에 일치하는 버킷 목록을 가져온다.
- 빠른 검색을 위해 폴더 prefix 를 받는다. (입력하지 않으면 전체 조회)
- 검색할 keyword 를 받는다.
즉, 앞에 폴더를 받고 + 검색하고 싶은게 있다면 keyword 도 추가로 입력하는 구조이다.
- prefix 및 keyword 를 기반으로 object 목록을 조회한다.
예를 들어, a00/ai-service/original 까지만 친다면?
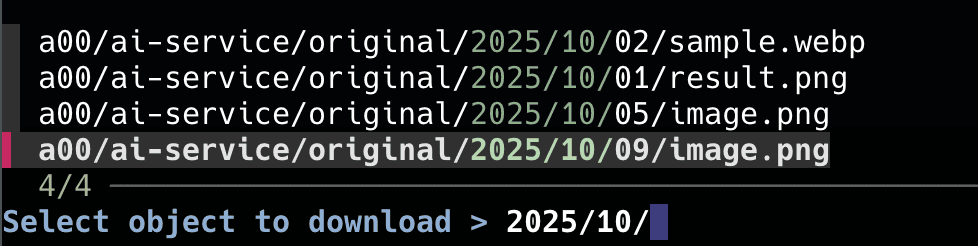
이런식으로 object 목록이 나온다. (이를 기반으로, 적절히 원하는거 검색 가능)
- 선택한 object 의 key 를 기반으로 파일을 다운 받는다.
3. PR의 JIRA 이슈 조회
- 요구사항 : PR 을 조회하다가, 이슈 내용이 궁금해졌을 때 바로 조회 하고 싶다.
function jpr() {
    local selected_line
    selected_line=$(gh pr list --json headRefName,number,title,author,updatedAt \
        --template '{{range .}}{{.headRefName}}{{"\t"}}#{{.number}}{{"\t"}}{{.title}}{{"\t"}}{{.author.login}}{{"\t"}}{{.updatedAt | timeago}}{{"\n"}}{{end}}' | \
        fzf --ansi --prompt="Select PR Branch > " \
            --header="BRANCH | PR # | TITLE | AUTHOR | UPDATED")

    if [[ -n "$selected_line" ]]; then
        local branch_name
        branch_name=$(echo "$selected_line" | awk -F'\t' '{print $1}')
        local issue_key
        issue_key=$(echo "$branch_name" | rg -o "AI_SERVICE-[0-9]+")

        if [[ -n "$issue_key" ]]; then
            echo "🔍 Found Jira Issue: $issue_key from branch: $branch_name"
            jira issue view "$issue_key" | bat -
        else
            echo "No Jira issue key found in branch name: $branch_name"
        fi
    fi
}- gh cli 를 통해 PR 목록을 조회한다.

- 브랜치 이름에서 정규식을 기반해 숫자를 추출한다.
- jira-cli 를 통해 issue 를 터미널에서 조회한다.
만약 웹사이트에 보고 싶다면, open "https://{도메인명}/browse/$key" 와 같이 바로 열 수 있다.
4. stash 목록으로 관리
- 요구사항 : 작업하며 stash 를 만드는데 아래와 같은 문제점이 발생한다.
- 어떤 stash 가 내가 찾는 stash 인지 모르겠다.
- stash 가 너무 많아지니 관리가 어렵다.
- stash pop, apply, drop 을 매번 치는게 귀찮다.
function gs() {
    local selected_stash
    selected_stash=$(git log -g refs/stash --pretty=format:'%gd%x09%ci%x09%x09%s' \
        | fzf --reverse --prompt="Select Stash > " --header="ID | Date | Message" \
               --preview="git stash show -p {1} | bat --color=always --paging=never")

    if [[ -n "$selected_stash" ]]; then
        local stash_id
        stash_id=$(echo "$selected_stash" | awk '{print $1}')
        echo
        read -k1 "action? (a)pply, (p)op, (d)rop, or (c)ancel? "
        echo
        case "$action" in
            a|A) git stash apply "$stash_id" ;;
            p|P) git stash pop "$stash_id" ;;
            d|D) git stash drop "$stash_id" ;;
            *)   echo "Cancelled." ;;
        esac
    fi
}- stash 목록을 조회한다.
--pretty=format:'%gd%x09%ci%x09%an%x09%s'이 부분은 나도 AI 에게 물어봐서 추출했다.
stash 기록을ID-날짜-작성자-메시지와 같이 출력하게 해준다.
(%gd: Reflog selector - stash@{0}, stash@{1} 을 출력,%x: tab,%ci: Commiter date,%s: subject)
%cr을 하면 relative time 을 출력해준다

- stash 를 선택한다.
- 선택한 stash 를 apply / pop / drop 할 지 선택한다.

5. 팀원이 올린 PR 로 브랜치 자동 체크아웃
- 요구사항 : PR 목록을 조회하고, PR 의 브랜치로 바로 체크아웃 하고싶다.
function gpr() {
    local pr_info
    pr_info=$(gh pr list --json number,title,author,headRefName,createdAt,updatedAt \
      --template '{{range .}}{{.number}}{{"\t"}}{{.title}}{{"\t"}}{{.author.login}}{{"\t"}}{{.createdAt | timeago}}{{"\t"}}{{.headRefName}}{{"\n"}}{{end}}' | \
      fzf --ansi --prompt="Select PR > " \
            --header="NUM | TITLE | AUTHOR | CREATED | BRANCH" \
            --preview="gh pr diff --color=always {+1}")

    if [[ -n "$pr_info" ]]; then
        local pr_number
        local branch_name
        # awk를 사용하여 탭으로 구분된 출력에서 PR 번호와 브랜치 이름을 추출
        pr_number=$(echo "$pr_info" | awk -F'\t' '{print $1}')
        branch_name=$(echo "$pr_info" | awk -F'\t' '{print $5}')

        if [[ -z "$branch_name" ]]; then
            echo "오류: 브랜치 이름을 가져올 수 없습니다."
            return 1
        fi

        # --- Stash uncommitted changes ---
        # 브랜치 이동 전, 저장하지 않은 변경사항이 있는지 확인하고 스태시에 저장합니다.
        if [[ -n $(git status --porcelain) ]]; then
            local current_branch
            current_branch=$(git rev-parse --abbrev-ref HEAD)
            local stash_message="gpr-stash: '$current_branch' -> '$branch_name' 이동으로 임시 저장"

            echo "현재 브랜치('$current_branch')에 저장하지 않은 변경사항이 있습니다. 스태시에 저장합니다."
            echo "스태시 메시지: \"$stash_message\""
            git stash -m "$stash_message"
            echo "변경사항이 성공적으로 스태시되었습니다. 나중에 'git stash pop'으로 복원할 수 있습니다."
        fi
        # --- End of Stash logic ---

        # 로컬에 브랜치가 이미 존재하는지 확인합니다.
        if git rev-parse --verify "$branch_name" >/dev/null 2>&1; then
            # 브랜치가 존재하면, 해당 브랜치로 이동하고 최신 변경사항을 pull 합니다.
            echo "브랜치 '$branch_name'이(가) 이미 존재합니다. 해당 브랜치로 이동합니다."
            git checkout "$branch_name"

            # git pull이 추적 브랜치를 찾을 수 있도록 설정합니다.
            echo "원격 브랜치(origin/$branch_name) 추적을 설정/업데이트합니다."
            if git branch --set-upstream-to="origin/$branch_name" "$branch_name"; then
                echo "'$branch_name' 브랜치의 최신 변경사항을 가져옵니다..."
                git pull
            else
                echo "오류: 원격 브랜치 'origin/$branch_name' 추적 설정에 실패했습니다."
                echo "PR이 포크(fork)된 저장소에서 온 경우, 원격(remote) 설정이 다를 수 있습니다."
            fi
        else
            # 브랜치가 존재하지 않으면, 'gh pr checkout'을 사용하여 새로 생성합니다.
            echo "PR #$pr_number 을(를) 체크아웃합니다..."
            gh pr checkout "$pr_number"
        fi
    fi
}
흔히, 우리가 코드 리뷰를 할 때, 본인 IDE 에서 코드를 보고 싶을 때 유용하게 사용할 수 있다.
기존에는, 작업하던걸 stash -> git checkout (브랜치가 없다면, git checkout -b) -> git pull
의 흐름을 브랜치 선택만으로 가능하게 해주는 것이다.
- PR 목록을 조회한다.
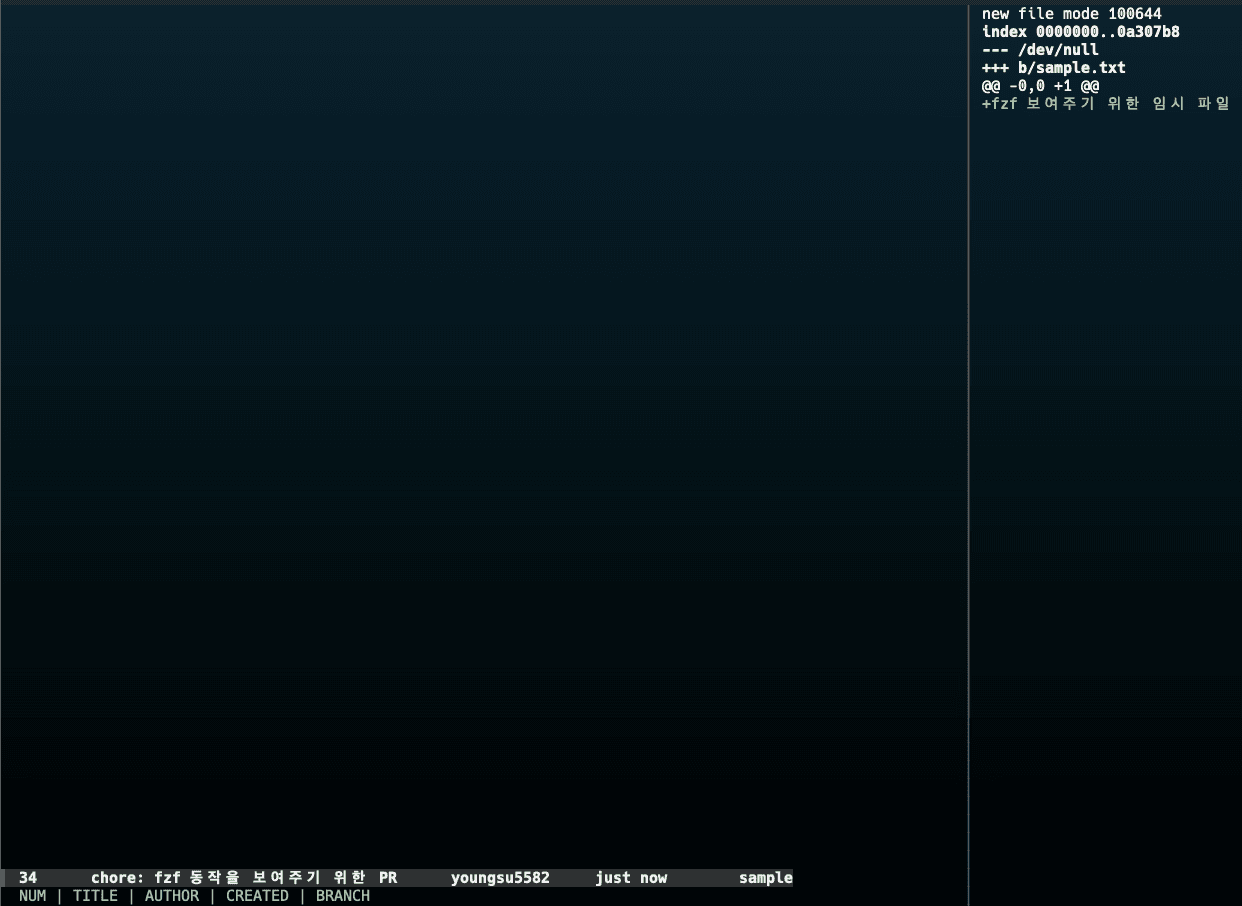
오른쪽은 gh diff 를 통해 PR 을 통해 변환된 라인들을 보여준다.
- 선택한 PR 에서 PR 숫자와 브랜치 이름을 추출한다.
- 지금 작업한 내용이 있다면, checkout 이 실패하므로 stash 를 한다.
if [[ -n $(git status --porcelain) ]]; then
            local current_branch
            current_branch=$(git rev-parse --abbrev-ref HEAD)
            local stash_message="gpr-stash: '$current_branch' -> '$branch_name' 이동으로 임시 저장"

            echo "현재 브랜치('$current_branch')에 저장하지 않은 변경사항이 있습니다. 스태시에 저장합니다."
            echo "스태시 메시지: \"$stash_message\""
            git stash -m "$stash_message"
            echo "변경사항이 성공적으로 스태시되었습니다. 나중에 'git stash pop'으로 복원할 수 있습니다."
fiporcelain: status 를 기계가 처리하기 좋게 보여준다(상태코드 파일경로) - 있는지만 확인하면 되기 때문
- 브랜치가 있는지, 없는지를 확인후 이동한다.
브랜치가 있으면, 이동 후 최신 변경사항을 pull
브랜치가 없으면, pr checkout 으로 최신사항을 가져오기
if git rev-parse --verify "$branch_name" >/dev/null 2>&1; then
	# 브랜치가 존재하면, 해당 브랜치로 이동하고 최신 변경사항을 pull 합니다.
	echo "브랜치 '$branch_name'이(가) 이미 존재합니다. 해당 브랜치로 이동합니다."
	git checkout "$branch_name"

	# git pull이 추적 브랜치를 찾을 수 있도록 설정합니다.
	echo "원격 브랜치(origin/$branch_name) 추적을 설정/업데이트합니다."
	if git branch --set-upstream-to="origin/$branch_name" "$branch_name"; then
		echo "'$branch_name' 브랜치의 최신 변경사항을 가져옵니다..."
		git pull
	else
		echo "오류: 원격 브랜치 'origin/$branch_name' 추적 설정에 실패했습니다."
		echo "PR이 포크(fork)된 저장소에서 온 경우, 원격(remote) 설정이 다를 수 있습니다."
	fi
else
	# 브랜치가 존재하지 않으면, 'gh pr checkout'을 사용하여 새로 생성합니다.
	echo "PR #$pr_number 을(를) 체크아웃합니다..."
	gh pr checkout "$pr_number"
fi
6. 스프링 로그 레벨 변경
- 요구사항 : 특정 서버의 스프링 로그 레벨을 원하는 대로 변경하고 싶다.
기존 actuator/loggers 는 매번 POST 요청을 보내는게 번거롭다.
추가로, 패키지 명을 전부 파악하는건 너무 번거롭다.
이번에는 함수를 통해 조금 더 깔끔하게 수행해보자.
function spring-target() {
    local targets=(
        "local-boot (http://localhost:8080)"
        "dev-server (http://dev.my-service.com)"
        "staging-server (http://staging.my-service.com)"
        "Enter custom target..."
    )

    local selected_target
    selected_target=$(printf "%s\n" "${targets[@]}" | fzf --prompt="Select Spring App Target > ")

    if [[ -z "$selected_target" ]]; then echo "❌ 취소되었습니다."; return 1; fi

    if [[ "$selected_target" == "Enter custom target..." ]]; then
        read "custom_target?Enter Actuator URL (e.g., http://localhost:8080): "
        if [[ -z "$custom_target" ]]; then echo "❌ 취소되었습니다."; return 1; fi
        export SPRING_ACTUATOR_TARGET="$custom_target"
    else
        export SPRING_ACTUATOR_TARGET=$(echo "$selected_target" | grep -o 'http://[^)]*')
    fi

    echo "✅ 타겟이 설정되었습니다: $SPRING_ACTUATOR_TARGET"
    spring-health
}
먼저 연결할 서버를 선택한다.
그리고, actuator 에 요청을 보낸다.
function spring-health() {
    _ensure_spring_target || return 1
    echo "🔍 '$SPRING_ACTUATOR_TARGET'의 헬스 체크 상태를 조회합니다..."
    _curl_actuator "health" | jq . | bat -l json --paging=never
}

function _curl_actuator() {
    local endpoint="$1"
    local response
    local http_status

    # curl로 응답 본문과 http 상태 코드 수신
    response=$(curl -s -w "\n%{http_code}" "$SPRING_ACTUATOR_TARGET/actuator/$endpoint")
    http_status=$(echo "$response" | tail -n 1)
    local body=$(echo "$response" | sed '$d')

    if [[ "$http_status" -ge 200 && "$http_status" -lt 300 ]]; then
        echo "$body" # 성공 시 본문만 출력
        return 0
    else
        # 실패 시 표준 에러(stderr)로 오류 메시지 출력
        echo "❌ 오류 발생! (Endpoint: /actuator/$endpoint, HTTP Status: $http_status)" >&2
        # 서버가 반환한 오류 본문이 있다면 보여줌
        echo "$body" | jq . >&2 2>/dev/null || echo "$body" >&2
        return 1
    fi
}
경로에 맞게 보내고, 상태코드에 따라 판단한다.
# 실시간으로 로그 레벨을 변경
function spring-loggers() {
    local loggers_json
    loggers_json=$(_curl_actuator "loggers") || return 1

    local logger_info
    logger_info=$(echo "$loggers_json" \
        | jq -r '.loggers | to_entries[] | "\(.key)\t\(.value.effectiveLevel)"' \
        | fzf --prompt="Select Logger to Modify > " --header="LOGGER | CURRENT_LEVEL")

    if [[ -z "$logger_info" ]]; then echo "❌ 취소되었습니다."; return 1; fi

    local logger_name
    logger_name=$(echo "$logger_info" | awk -F'\t' '{print $1}')

    local levels="DEBUG\nINFO\nWARN\nERROR\nOFF\nNULL (reset to default)"
    local selected_level
    selected_level=$(echo "$levels" | fzf --prompt="Select New Level for '$logger_name' > ")

    if [[ -z "$selected_level" ]]; then echo "❌ 취소되었습니다."; return 1; fi

    local level_payload
    if [[ "$selected_level" == "NULL"* ]]; then
        level_payload="null"
    else
        level_payload="\"$selected_level\""
    fi

    echo "🔄 '$logger_name'의 로그 레벨을 '$selected_level'(으)로 변경합니다..."

    local http_status
    http_status=$(curl -s -o /dev/null -w "%{http_code}" \
        -X POST -H "Content-Type: application/json" \
        -d "{\"configuredLevel\": $level_payload}" \
        "$SPRING_ACTUATOR_TARGET/actuator/loggers/$logger_name")

    if [[ "$http_status" -ge 200 && "$http_status" -lt 300 ]]; then
        echo "\n✅ 요청 성공 (HTTP $http_status). 변경된 로그 레벨을 확인합니다..."
        _curl_actuator "loggers/$logger_name" | jq . | bat -l json
    else
        echo "\n❌ 오류 발생! (HTTP $http_status)"
        echo "   - Actuator 엔드포인트가 활성화되어 있고, 쓰기 권한이 있는지 확인하세요."
    fi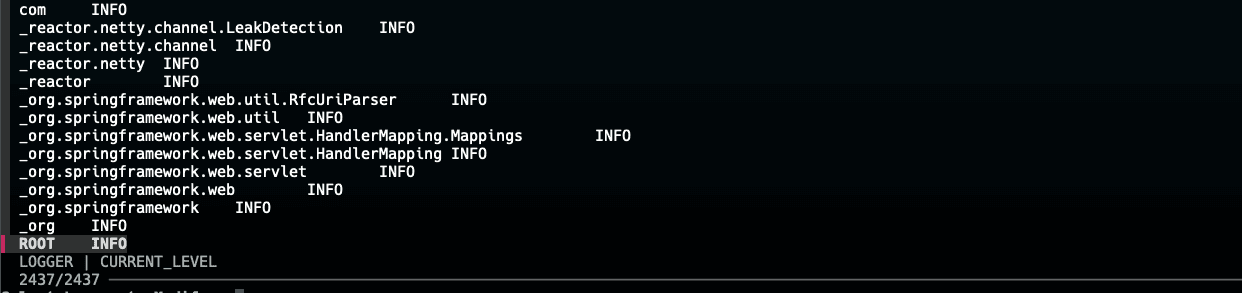
}acutator/loggers를 통해 로그 목록을 조회한다.- 로그 목록을 적절히 파싱해 클래스 명과 현재 로그 레벨을 보여준다.
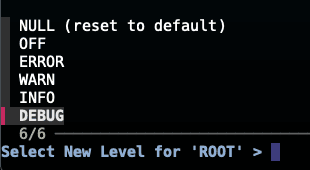
- 로그 레벨을 선택한다.
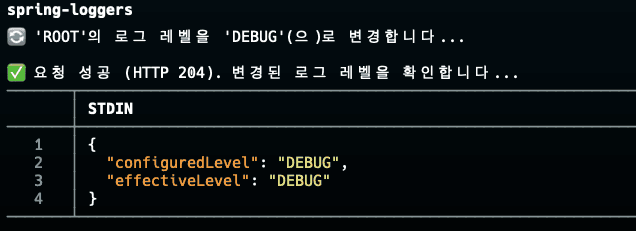

디버그로 잘 변경이 된 걸 볼 수 있다!
마무리
어떤가?
정말 정말 다양한 함수들을 생성할 수 있을것만 같지 않은가?? 🤩
사실 내가 사용하는 함수들은 좀 더 있다.
'특정 사용자 슬랙 이슈 조회', 'DB 덤프 떠서 로컬에 넣기', 'trace-id 기반 모든 로그 조회', '팀 내 개발한 스냅샷 테스트를 자동화' 등등등
특정 사용자 슬랙 이슈 플로우에 대해 간략히 설명하면?
- 사용자 목록을 제공후, 선택하게 한다.
- 사용자 ID 를 기반으로, 이슈를 조회한다.
- 이슈를 선택하면, 브라우저에 지라 주소를 열어 보여준다.
등등, 위의 내용과 유사하다.
하지만 이런 함수들을 모두 다 적는것보다 가능성을 보여주고 싶었다. 각자의 팀이 겪는 반복적인 작업들은 다양할 것이다.
fzf 나 cli 도구들을 통해 이런 요소들을 간단화 할 가능성이 존재할 거라고 믿는다!
(터미널에 명령어를 쳐서 불필요하게 하는 작업들이라면? 또는 엑셀 같은것도 가능은 하지 않을까...?)
특히, AI 가 이런 컨텍스트를 이미 잘 이해하고 있다. 오픈소스 기반이기도 하고, 터미널의 개발자의 유구한 전통이기도 하니까.
언제나 우리 개발자들은 단순 작업 및 개발에 벗어나 가치를 향해 추구해나가자.
空