Deploying with only Free Tier
이영수|2025년 3월 9일|11분 읽기
This post covers building an AWS infrastructure using only the Free Tier.
It utilizesRDS,EC2,ElastiCache,CodeDeploy,Chatbot,S3, andAmplify.
AWS Free Tier List
Amazon provides a surprisingly large number of services for free for one year.
(How great would it be if it were for two years...)
Here are some of the key offerings:
- EC2: 750 hours - t3.micro, 12 months free
- RDS: 750 hours - MySQL, PostgreSQL, 12 months free
- ElastiCache: 750 hours - cache.t3.micro
- DynamoDB: 25GB - Capacity to handle 200 million requests per month
- S3: 5GB, 20,000 GET requests, 2,000 PUT requests
- CloudWatch: 10 - 1 million API requests, 5GB log data collection and 5GB archive
- CloudFront: 1TB - 1 million HTTP, HTTPS requests
- Amplify: 1,000 build minutes per month, 15GB served per month, 500,000 requests per month
- CodeBuild: 100 minutes - 100 minutes of arm1.small build time
- CodePipeline: 1 - 1 active pipeline per month
- Lambda: 1 million requests per month, up to 3.2 million seconds
- SNS: 1 million publications per month, 100,000 HTTP/HTTPS deliveries, 1,000 email deliveries
There are many more, of course.
Of course, there are a ton of other elements, but I've only listed the ones that a backend developer can easily approach.
Here, we will use Github Actions & CodeDeploy instead of CodeBuild & CodePipeline.
(Because 100 minutes is surprisingly short.)
- Server: EC2
- Database: RDS, ElastiCache
- Build Storage: S3
- Frontend CI & CD: Amplify
- Backend CI & CD: Github Actions, CodeDeploy
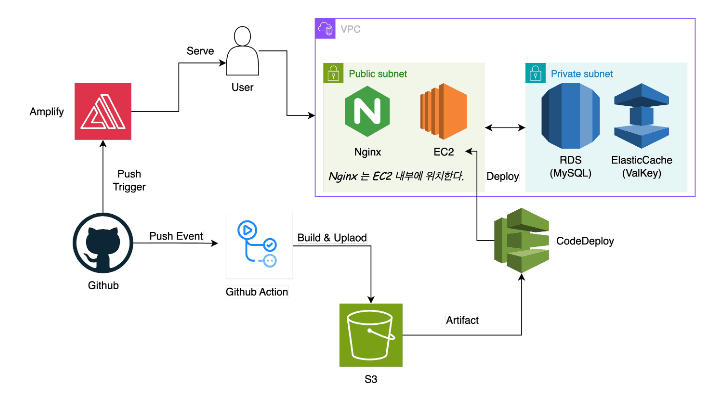
This is the configuration plan for this time.
The configuration order below is:
VPC -> Database(RDS, ElastiCache) -> Amplify -> EC2 -> CodeDeploy
VPC
It seems easier to create the VPC first to avoid confusion in the configuration.
VPC: Virtual Private Network, determines which network to place our infrastructure in and how to arrange it.
Select VPC, etc.
- Name: lotto-prod-vpc
- IPv4 CIDR: 10.0.0.0/16
- Availability Zones: 1
- Public Subnets: 1
- Private Subnets: 2
The reason for having two private subnets is that RDS must guarantee 2 AZs. - Availability
And, you must enable
Enable DNS resolutionandEnable DNS hostnames.
-> This is because without DNS, an AWS EC2 instance cannot communicate with the outside world, even with a public IP. - Failed to resolve domain name to IP address (I was stuck here for about an hour or two).
Subnet Group
- Name: lotto-prod-subnet-private-group
- vpc-id: lotto-prod-vpc
Created for use with ElastiCache
Security Group
Set up inbound and outbound rules for use with EC2 - RDS, Cache.
- Name: ec2-to-cache-outbound-group
- vpc-id: lotto-prod-vpc
- Outbound: 6379, 0.0.0.0 specified
- Tag: project-lotto
=> Specify in EC2
- Name: ec2-to-cache-inbound-group
- vpc-id: lotto-prod-vpc
- Inbound: 6379, 0.0.0.0 specified
- Tag: project-lotto
=> Specify in ElastiCache
- Name: ec2-to-rds-outbound-group
- vpc-id: lotto-prod-vpc
- Outbound: 3306, 0.0.0.0 specified
- Tag: project-lotto
=> Specify in EC2
- Name: ec2-to-rds-inbound-group
- vpc-id: lotto-prod-vpc
- Inbound: 3306, 0.0.0.0 specified
- Tag: project-lotto
=> Specify in RDS
- Name: ec2-public-group
- vpc-id: lotto-prod-vpc
- Inbound: 443, 22, 80 specified
RDS
These days, RDS also provides a template that can be easily configured for the free tier.
As you scroll down, there are elements you can choose from, so I'll skip the explanation.
- Standard create
- MySQL
- Free tier
- DB instance identifier: lotto-database-prod
- Master username: lotto_user
- Self-managed: Auto generate passwords
- Storage autoscaling: No
- Don't connect to an EC2 compute resource
- vpc: lotto-prod-vpc
- Security group: ec2-to-rds-inbound-group
- Availability Zone: ap-northeast-2a
- Log exports: Error log, Slow query log
- Initial database: lotto
ElastiCache
I used Valkey instead of Redis here for the following reasons:
- AWS strongly promotes it as being 30-40% cheaper.
- I don't need Redis's high-availability cluster or proven stability.
- Since it started based on Redis's open source, a huge number of parts are similar.
This part also provides elements to choose from, just like RDS, so I'll skip the explanation.
- Use ElastiCache for Valkey
- Design your own cache -> Cluster cache
- Disable cluster mode
- Location: AWS Cloud, Don't use multi-AZ, Don't use automatic failover
- Node type: cache.t3.micro
- Replicas: 0
- Don't use automatic backup
- Security group: ec2-to-cache-inbound-group
- Log: Use slow log (JSON, CloudWatch Logs)
- Tag: project-lotto
Here, VPC - Subnet Group - Subnet is required.
- Don't use backup
If you want to check if the server is running well,
from inside the VPC (i.e., run EC2 and from inside),
nc -zv <DB_HOSTNAME> <DB_PORT>If you send a request,
Connection to <DB_HOSTNAME> (<DB_IP>) <DB_PORT> port [tcp/redis] succeeded!it will respond.
This allows you to know if the DB is running and LISTENING properly and if the inbound-outbound connection between instances is established.
Amplify
It seamlessly connects the frontend app from build to deployment.
Actually, I just learned about it properly this time, and it has a lot of great features.
- Select Github
- Select repository, select branch
- Select mono repository (if it's not just the frontend, but they are together)
- Specify frontend build command
- Set environment variables
If you push to Github, it receives a webhook and proceeds with the build and deployment.

The time for build and deployment is also very fast, about 2 minutes and 20 seconds. (Confirmed that disabling caching also works)
Amplify has WAF, which has elements for country restrictions, vulnerability and malicious attack protection.
It's an essential feature, but since it's not free tier, I'll pass (as of 2025.03.08).
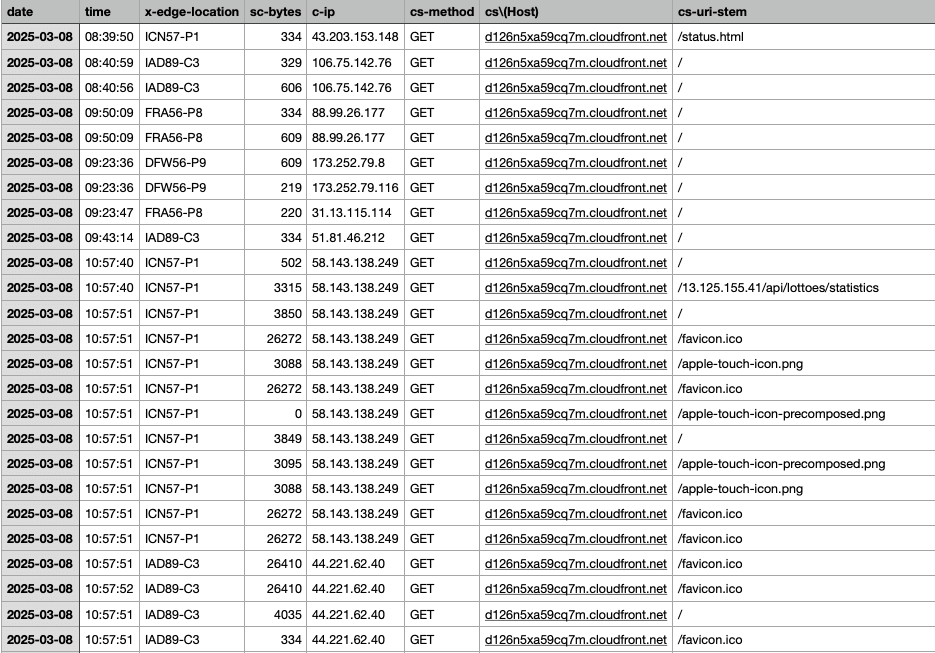
You can also easily download and view what kind of requests are coming to our server.
EC2
Instance settings:
-
Architecture: 64-bit (x86) - The free tier offering is currently fixed
-
Instance type: t2.micro - 1vCPU, 1GiB memory
-
Allow SSH traffic: From anywhere
-
Allow HTTP/HTTPS traffic from the internet
-
Storage configuration: 10GiB, gp3 root volume
-
Tag settings: profile - prod, project - lotto
-
Security group: ec2-public-group
Pre-installation
You need to install Java and the Agent initially to run the server.
# Create JDK installation directory
sudo mkdir /usr/lib/jvm

wget https://download.java.net/java/GA/jdk21.0.2/f2283984656d49d69e91c558476027ac/13/GPL/openjdk-21.0.2_linux-x64_bin.tar.gz -O /tmp/openjdk-21.0.2_linux-x64_bin.tar.gz

# Unzip
sudo tar xfvz /tmp/openjdk-21.0.2_linux-x64_bin.tar.gz --directory /usr/lib/jvm
rm -f /tmp/openjdk-21.0.2_linux-x64_bin.tar.gz

# Set alternatives
sudo update-alternatives --install /usr/bin/java java /usr/lib/jvm/jdk-21.0.2/bin/java 100
sudo update-alternatives --set java /usr/lib/jvm/jdk-21.0.2/bin/java

# Set environment variables
export JAVA_HOME=/usr/lib/jvm/jdk-21.0.2
export PATH=$PATH:/usr/lib/jvm/jdk-21.0.2/bin

# Check
java -version
You can install it according to your version and vendor, and set the environment variables.
#!/usr/bin/env bash

sudo apt-get update -y
sudo apt-get install -y ruby
cd /home/ubuntu
wget https://aws-codedeploy-ap-northeast-2.s3.amazonaws.com/latest/install
chmod +x ./install
sudo ./install auto
And, install and run the CodeDeploy Agent.
Additionally, EC2 needs permission to run the CodeDeploy Agent.
Create a policy name in IAM policies and
give it EC2InstanceConnect, AWSCodeDeployFullAccess, and AmazonS3FullAccess permissions.
CodeDeploy will automatically proceed with the deployment by accessing the files in S3.
(InstanceConnect is for convenience) (If you are concerned about S3 permissions, you can just give GET permission.)
Actions -> Security -> Modify IAM role -> Set to the role we created.
Swap Memory
t2.micro has 1.0 GiB of RAM. This is very desperate, so swap memory is needed.
sudo fallocate -l 2G /swapfilechmod 600 /swapfilesudo mkswap /swapfilesudo swapon /swapfileecho '/swapfile none swap sw 0 0' | sudo tee -a /etc/fstab(Specify to be set automatically even after rebooting)
You can check if swap memory is enabled with
free -h.
Domain Purchase
If you don't want to deploy your site with a fixed IP or amplify.app, buy a domain.
Anyway, the new price for one year is really not that much.
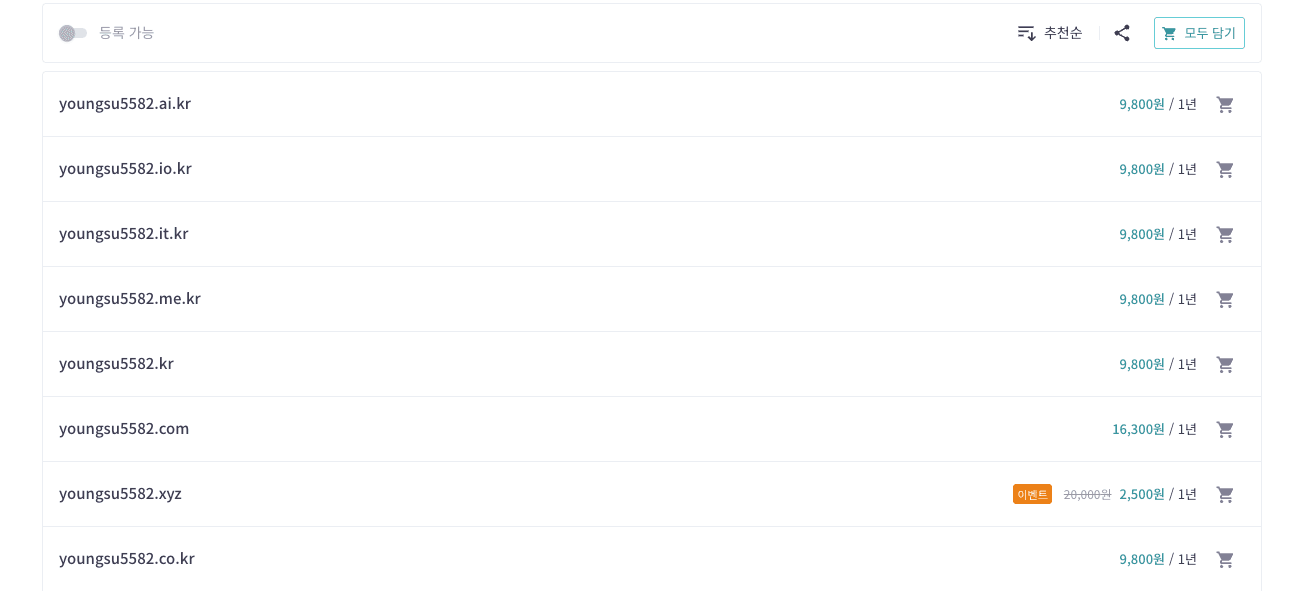
Isn't it worth giving up about 2,500-10,000 won for style?
To buy hosting, you need to enter administrator information, and since it goes up on whois or the DNS server to show who the owner of this site is, let's write it correctly.
Now, you can register the server's address as you like.

Amplify & HTTPS
If you add our domain to a custom domain, it will automatically generate an SSL certificate.
Go to Hosting - Custom domains - Add domain and
- Enter your root domain.
- Click on Manual configuration of hosting area. (We will configure it directly without using Route53 - additional cost)
- It will tell you the
host name,format, anddatafor registration with the hosting service, and
it will also providecloudfrontdata to point to the subdomain.
At this time, the important thing to note is that you have to extract the last DNS appropriately yourself.
For example, I was instructed to copy something likelotto.web.younsgu5582.life, but when I put it into the hosting server, I only had to put inlotto.web.
After that, the DNS information is propagated and the authentication is complete!
nslookup <domain_name>
whois <domain_name>
You can also check if the domain is registered correctly and if the information is registered well through these two.
Nginx & Certbot
On the server, we also apply it to receive HTTPS, not just plain HTTP.
(HTTP generally causes a Mixed Contents error when requesting HTTPS <-> HTTP, and the request is rejected.)
sudo apt-get update
sudo apt-get install certbot python3-certbot-nginx
sudo certbot --nginx -d <API_server_address>
If it asks you to enter y/n, enter y -> y -> n (the last one is about sending you news based on your email).
Through this process, you will be issued a certificate and receive fullchain.pem and privkey.pem.
Then, you can set ssl_certificate and ssl_certificate_key correctly in nginx.
server {
    listen 443 ssl;
    server_name <API_server_address>;

    ssl_certificate <fullchain.pem>;
    ssl_certificate_key <privkey.pem>;

    # (Optional) Strengthen SSL settings
    ssl_protocols TLSv1.2 TLSv1.3;
    ssl_ciphers HIGH:!aNULL:!MD5;

    location / {
        proxy_pass http://127.0.0.1:8080;
        # or root /var/www/html; etc. desired backend/static directory
        proxy_http_version 1.1;
        proxy_set_header Host $host;
        proxy_set_header X-Real-IP $remote_addr;
        }
}

server {
    listen 80;
    server_name <API_server_address>;
    return 301 https://$host$request_uri;
}
sudo nginx -t
sudo systemctl restart nginxAfter restarting to apply the settings, you can check if it responds by sending a request to the API server address.
Code Deploy
I did not use CodeBuild or CodePipeline.
First of all, I felt that 100 minutes a month was surprisingly short.
A backend deployment generally takes about 2-3 minutes (it's faster if you exclude tests), so about 50-60 deployments would incur additional costs.
-> Therefore, I can't use CodePipeline either.
Instead, I decided to have Github Actions handle the build -> S3 upload -> Deploy execution.
Let's create an application.
- Application name: lotto-code-deploy
- Compute platform: EC2/On-Premises
Create deployment group
- Deployment group name: lotto-prod-group
- Create role: Key(profile), Value(prod)
- Agent configuration with AWS Systems Manager
- Deployment configuration: AllAtOnce
- Disable load balancer
Since we are using a single server, we will not consider deployment strategies and load balancers.
User
Create a user to run from Github Actions.
- User name: lotto-user
- S3FullAccess, CodeDeployFullAccess
And, create an access key and
prepare the access key and secret key. (- Use case: local code)
Github Action
- name: Create deploy package
  run: |
    zip -r deployment-package.zip build/libs/spring-lotto.jar appspec.yml deploy

- name: Configure AWS credentials
  uses: aws-actions/configure-aws-credentials@v4
  with:
    aws-access-key-id: ${{ secrets.AWS_ACCESS_KEY_ID }}
    aws-secret-access-key: ${{ secrets.AWS_SECRET_ACCESS_KEY }}
    aws-region: ${{ secrets.AWS_REGION }}

- name: Upload to S3
  run: |
    aws s3 cp deployment-package.zip s3://${{ secrets.S3_BUCKET_NAME }}/deployment-package.zip

- name: Deploy to CodeDeploy
  run: |
    aws deploy create-deployment \
      --application-name ${{ secrets.APPLICATION_NAME }} \
      --deployment-group-name ${{ secrets.DEPLOYMENT_GROUP_NAME }} \
--s3-location bucket=${{ secrets.S3_BUCKET_NAME }},key=deployment-package.zip,bundleType=zip- Compress the build file and necessary scripts and appspec.yml.
- Authenticate through Credentials in the Action.
- Upload the compressed file to S3.
- Run Deploy based on the file stored in S3.
Github Action Secret
AWS_ACCESS_KEY_ID
AWS_SECRET_ACCESS_KEY
AWS_REGION : ap-northeast-2

APPLICATION_NAME : lotto-code-deploy
DEPLOYMENT_GROUP_NAME : lotto-prod-group
S3_BUCKET_NAME : spring-lotto-build-bucket
You can check if it works by putting the values in the Secret like this.
AWS Chatbot
It is very cumbersome to go in and check the deployment every time. We will use AWS Chatbot.

This is also free of charge.
It is now called Q Developer in chat applications.
Configure new client -> Select Slack -> Request permission for the channel you want to use.
And, let's configure the channel.
- Slack channel: Specify the channel to receive
- Role name: aws-chatbot-slack-codedeploy-role
- Policy template: Notification permissions, Read-only command permissions
- Notifications: Not selected (Anyway, the main purpose is to send requests to Slack, so additional elements like SMS are not needed.)
- Guardrail policy: CodeDeployFullAccess
And, let's invite it to the channel with /invite @Amazon Q.
Alarm rules in CodeDeploy
You also need to make additional settings in CodeDeploy.
Go to Application - Settings and create an alarm rule.
- Detail type: Full
- Events that trigger alarms: Succeeded, Failed
- Configured target: AWS Chatbot
- ARN: The Chatbot ARN created above
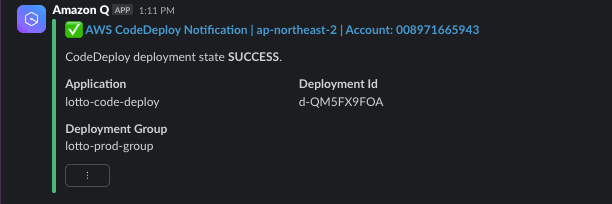
If you receive deployment permission like this, it is a success.
Conclusion
It turned out to be more plausible than I thought. 🙂 (CI, CD + DB + HTTPS, etc.)
Looking at the cost estimate?

You can see that it is less than $3.
I think I will introduce SNS or Lambda parts in the future.
I was hesitant to deploy my side project because of the cost and hassle,
but with a conscious free tier configuration, it is a very cheap amount. (Rather, the EC2 that I had prevented out of laziness was not covered by the free tier, so it was more expensive.)
I think it's good to enjoy all the features that AWS provides at least once.
Below are the trial and error I experienced while trying.
Tips
- Network interfaces can only be deleted if all the elements that use them are separated. (RDS, CACHE network interfaces, etc.)
- If security groups refer to each other, you must release one to delete it.
scp -i <key-pem> <file_to_transfer> <user>@<server_address>:<destination_filename_and_path>Let's transfer the necessary files through this.
mysql -h <RDS-endpoint> -u <db-username> -p < /home/ubuntu/big_inserts.sqlYou can move the file and send it to the DB.
-
The CodeDeploy elements are located in
/opt/codedeploy-agent.- The folders corresponding to the deployment IDs are located here. (About 5)
- The files that are being attempted to be built are in the
deployment-archivefolder.
-
It's best to set a budget in advance.
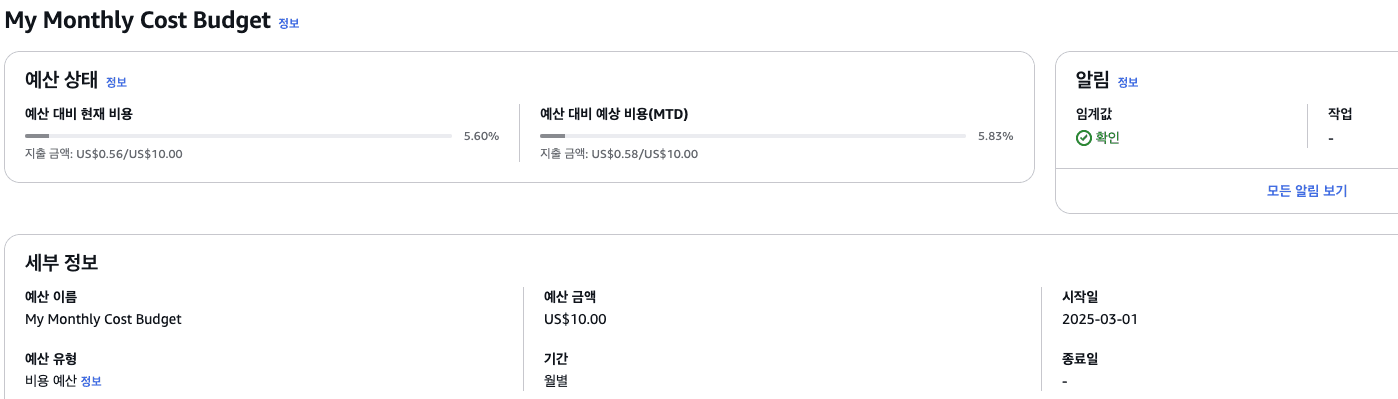
You can specify a threshold and receive an email when it is reached.
You can also easily receive an email if the current amount is not exceeded without additional settings.
(I set it to 50% & 80%.)
空